How to Shape Sourdough
Making sourdough bread is very of the moment and we’ve had lots of queries about it, particularly how to shape it before it goes in the oven.
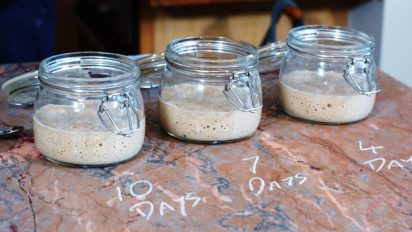
Starters just a few days after being made from scratch.
We thought the best way to show you would be to do a video about it which you can see here. And there’s some notes below as well.
Things you’ll find useful are –
- a digital scale for accurate weighing.
- a couple of banettons or proving baskets to support the dough as it rises.
- a couple of dough scrapers to make cutting and handling the dough easier.
- a piece of clean linen or a clean tea towel to cover the dough as it’s rising.
- a peel to put the dough in the oven.
- semolina for dusting your banettons/proving baskets and your peel.
- a pizza or bread stone in your oven to cook the bread on – this is pre-heated in advance and gives your bread lots of bottom heat, helping it with its rise.
- a spray bottle for spraying plenty of water into your oven – again this helps with the rise.
- a probe thermometer to tell the temperature and see that your bread is cooked.
- a wire cooling rack to cool the bread once it’s come out of the oven.
- a very sharp knife or bakers lame to score your bread.
- you can also download our sourdough app so you can have David with you in your own kitchen while you’re baking, if only virtually!
To shape your dough –
This describes how to shape the dough ready for the basket or banneton once it has had its first period of fermentation. Remember this is all in conjunction with the video we made so do check that out too!
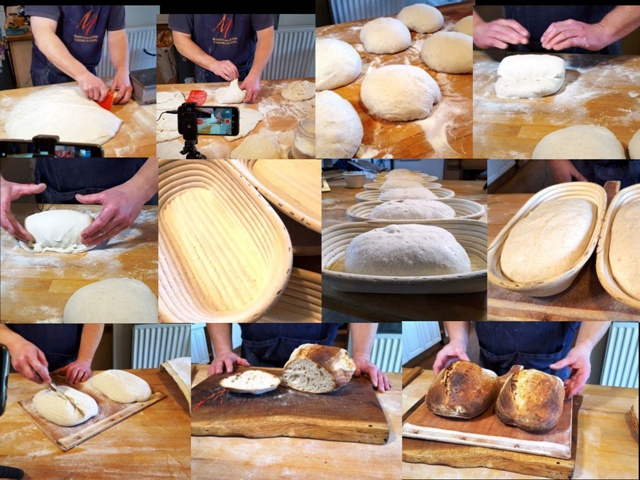
Stages of Shaping Your Sourdough
- cut it into 880g pieces for large loaves and 440g for small loaves using your dough scrapers.
- put a little semolina on your work surface. Place your weighed dough onto the semolina and pull one side out and over the top. Seal the pulled bits to the top as you do so to retain tension. Repeat for each edge of the dough until you have gone once round the dough.
- put each dough sealed side down on some more semolina and cover with a linen couche cloth or clean tea towel; leave the dough to rest for 15 minutes.
- knock your banettons or proving baskets on the bench to remove old flour/semolina. If necessary use a dry brush to get rid of any stuck-on old pieces of dough.
- dust your banetton or proving basket generously with semolina to stop the dough sticking.
- after the dough has rested, handle each one carefully so you don’t damage the outer crust and give it its second shaping. Really try not to break into the dough with your fingers as that will make it sticky and difficult to manage – gentle but firm handling essential!
- pull each side out and seal on top to form a rectangle, putting the seal on the top; turn it so the short end is towards you.
- roll the dough up tightly by putting your fingers at the base at the short end of the dough and then rolling it up on to itself and pulling it back towards you, tensioning the dough as you do so.
- when you get to the end of the dough, really pinch the dough together to make sure the seam is completely sealed. This retains tension in the crust of the dough.
- put the shaped dough, seam side up, into its banetton and leave it covered with your piece of linen for 4-5 hours or until your dough is ready (this will depend on the ambient temperature, the mix of your flours, the vigour of your starters etc).
- when the dough is well fermented, turn it on to a wooden peel that you’ve dusted with semolina.
- use a very sharp knife or lame to slash the top of the dough; don’t put down into the dough, just sweep the blade over the top from end to end.
- bake the dough in a hot oven (230°-240°C) until it’s cooked and has reached at least 95°C internally. If you don’t have a thermometer you can tap the bottom of the dough. Expect to hear a pronounced hollow thrumming when it’s fully cooked.
- Bring the loaves out of the oven and cool on a wire rack before cutting.